Authentication Modules
The MyGet Enterprise plan provides support for external authentication modules to sign in to the web application. This document describes the available authentication modules and how to configure them.
Let's look at the available authentication modules and instructions for setup and configuration. All authentication modules will require some configuration on both MyGet side and authentication provider side.
Auth0
To allow users to sign in to MyGet using their Auth0 account, enable the Auth0 authentication module.
Once the Add authentication module dialog is shown, we can find Settings for Auth0. Make sure to keep this window open as we will need it for the remainder of the configuration steps.
In a separate browser window:
- Sign in to your Auth0 account and open the dashboard under Clients.
- Click Create client, enter a client name (e.g. MyGet), and select Regular Web Applications as the client type.
- Click Create.
- In the client management dashboard, open the Settings tab. Note the Domain, * Client ID* and Client Secret values which we will need later on. But let's first configure the Auth0 side!
- For Token Endpoint Authentication Method, select POST.
- In the Allowed Callback URLs field, paste the allowed callback URL that is displayed in MyGet Settings for Auth0. This will be similar to
https://[you].myget.org/signin-auth0. - In the Allowed Web Origins field, paste the allowed web origin URL that is displayed in MyGet Settings for Auth0.
- Click the Save Changes button.
Back in the MyGet Add authentication module dialog:
- Copy/paste the Auth0 application domain, Auth0 client id and Auth0 client secret.
- Click Add to save the configuration.
Azure Active Directory
To allow users to sign in to MyGet using their Azure Active Directory account, enable the Azure Active Directory authentication module.
Step 1: Configure Azure Active Directory in MyGet
- Go to the MyGet Settings page.
- In the Authentication Modules section, click Add Authentication Module.
- Select Azure Active Directory from the list of available modules.
- This will display the Azure Active Directory Settings window. Keep this window open as you will need this information for the configuration steps in Azure.
Step 2: Register the Application in Azure Portal
In a new browser window:
- Sign in to your Microsoft Azure Portal (https://portal.azure.com/).
- Navigate to Azure Active Directory → App Registrations → New Registration.
- Fill in the following details:
- Name: Enter a meaningful name for the application (e.g., "MyGet").
- Supported account types: Choose Accounts in this organizational directory only or as per your organization's needs.
- Redirect URI: Select Web and paste the Sign-on URL from the MyGet Azure Active Directory Settings window.
- Click Register.
Step 3: Configure Application Settings
- After the app is created, navigate to the Authentication tab.
- In the Redirect URIs section, ensure the Reply URL from the MyGet Azure Active Directory Settings window is added. Click Save.
- Under Certificates & Secrets, create a Client Secret by clicking New Client Secret. Set the expiration as per your security policies.
- Copy the generated secret immediately. You will not be able to view it again later.
- In the API permissions tab, click Add a permission → Microsoft Graph → Delegated Permissions, and select the required permissions. Click Add permissions.
Step 4: Finalize MyGet Configuration
Return to the MyGet window:
- Copy and paste the Application (client) ID and Directory (tenant) ID from the Azure app into the corresponding fields in MyGet's Azure Active Directory settings.
- Paste the Client Secret you generated earlier into the Azure Active Directory Application Secret field in MyGet.
- (Optional) If you are using a non-default Azure environment (e.g., Germany, China), enter the appropriate Azure AD Instance URL (e.g., https://login.microsoftonline.de for Germany).
- Click Add to save the configuration.
Step 5: Test the Integration
- Sign out of MyGet and attempt to sign in using the Azure Active Directory option.
- Verify that the application redirects you to your organization's AAD sign-in page and successfully authenticates you.
GitHub
To allow users to sign in to MyGet using their GitHub account, enable the GitHub authentication module.
Once the Add authentication module dialog is shown, we can find Settings for GitHub. Make sure to keep this window open as we will need it for the remainder of the configuration steps.
In a separate browser window:
- Sign in to your GitHub account and register a new OAuth application with GitHub.
- Specify the general parameters to register a new OAuth application: Application name, Homepage URL, and an optional Application description.
- In the Authorization callback URL, paste the callback URL that is displayed in MyGet Settings for GitHub.
- Click the Register application button. GitHub will generate the credentials required to configure MyGet.
Back in the MyGet Add authentication module dialog:
- Copy/paste the GitHub client id and GitHub client secret.
- Optionally, MyGet access can be limited to only allow certain GitHub organizations to login. Enter the organization names in the Allowed GitHub organizations field if desired. Organization names can be separated with semicolon. Leave the field blank to not enforce organization checks.
- Click Add to save the configuration.
To allow users to sign in to MyGet using their Google account, enable the Google authentication module.
Once the Add authentication module dialog is shown, we can find Settings for Google. Make sure to keep this window open as we will need it for the remainder of the configuration steps.
In a separate browser window:
- Sign in to your Google account and open API credential management.
- From the Create credentials dropdown, select OAuth client ID.
- Click Create credentials, then OAuth Client ID.
- (optional) in the OAuth consent screen page, enter a product name (e.g. MyGet) and click Save.
- For the Application type, select Web application.
- In the Authorized redirect URIs field, paste the redirect URL that is displayed in MyGet Settings for Google.
- Click the Create button. Google will generate the credentials required to configure MyGet.
Back in the MyGet Add authentication module dialog:
- Copy/paste the Google client id and Google client secret.
- Click Add to save the configuration.
Microsoft Account
To allow users to sign in to MyGet using their Microsoft Account, enable the Microsoft Account authentication module.
Once the Add authentication module dialog is shown, we can find Settings for Microsoft Account. Make sure to keep this window open as we will need it for the remainder of the configuration steps.
In a separate browser window:
- Sign in to your Microsoft Account account and open My Applications.
- Under Converged appications, click the Add an app button.
- In the Application Name field, enter an application name (e.g. MyGet).
- Make sure Let us help you get started is disabled and click Create.
- Under Platforms, click Add Platform and select Web.
- Make sure to enable the Allow Implicit Flow checkbox.
- In the Redirect URLs field, paste the redirect URL that is displayed in MyGet Settings for Microsoft Account.
- In the Logout URL field, paste the redirect URL that is displayed in MyGet Settings for Microsoft Account.
- (optional) In the Home Page URL field, enter your MyGet Enterprise URL.
- Click the Save button. Microsoft Account will generate the credentials required to configure MyGet.
Back in the MyGet Add authentication module dialog:
- Copy/paste the Microsoft Account application id that is displayed under My Applications - Converged applications.
- Click Add to save the configuration.
Okta
Refer the Okta integration guidelines to integrate the Okta identity solution with MyGet.
StackExchange
To allow users to sign in to MyGet using their StackExchange account, enable the StackExchange authentication module.
Once the Add authentication module dialog is shown, we can find Settings for StackExchange. Make sure to keep this window open as we will need it for the remainder of the configuration steps.
In a separate browser window:
- Sign in to your StackExchange account and open Register a new app.
- In the Application Name field, enter an application name (e.g. MyGet).
- In the Description field, enter an description.
- In the OAuth domain field, paste the domain that is displayed in MyGet Settings for StackExchange.
- In the Application website field, paste the application website that is displayed in MyGet Settings for StackExchange.
- Click the Register Your Application button. StackExchange will generate the credentials required to configure MyGet.
Back in the MyGet Add authentication module dialog:
- Copy/paste the StackExchange client id, StackExchange client secret and StackExchange key.
- Click Add to save the configuration.
WS-Federation (ADFS)
To allow users to sign in to MyGet using their ADFS account, enable the WS-Federation authentication module.
Once the Add authentication module dialog is shown, we can find Settings for WS-Federation (ADFS). Make sure to keep this window open as we will need it for the remainder of the configuration steps.
On your ADFS server (guide based on Microsoft Docs - Create a Relying Party Trust):
- In Server Manager, click Tools, and then select AD FS Management.
- Under Actions, click Add Relying Party Trust.
- On the Welcome page, choose Claims aware and click Start.
- On the Select Data Source page, click Enter data about the relying party manually, and then click Next.
- On the Specify Display Name page, enter a display name (e.g. MyGet). Optionally a description can be added as well. Click Next.
- On the Configure Certificate page, click Next
- On the Configure URL page, enable the* Enable support for the WS-Federation Passive protocol* checkbox. In the Relying party WS-Federation Passive protocol URL field, paste the reply URL that is displayed in MyGet Settings for WS-Federation (ADFS). Click Next.
- On the Configure Identifiers page, specify two identifiers for this relying party:
- The sign-on URL that is displayed in MyGet Settings for WS-Federation (ADFS)
- The reply URL that is displayed in MyGet Settings for WS-Federation (ADFS)
- On the Choose Access Control Policy page, select a policy and click Next.
- On the Ready to Add Trust page, review the settings, and then click Next to save your relying party trust information.
- On the Finish page, click Close. This action automatically displays the Edit Claim Rules dialog box.
MyGet will need these claims to be present:
- NameIdentifier (
http://schemas.xmlsoap.org/ws/2005/05/identity/claims/nameidentifier) – you can use the AD user name for this claim, as long as it's unique per user. - Name (
http://schemas.xmlsoap.org/ws/2005/05/identity/claims/name) - Email address (
http://schemas.xmlsoap.org/ws/2005/05/identity/claims/emailaddress)
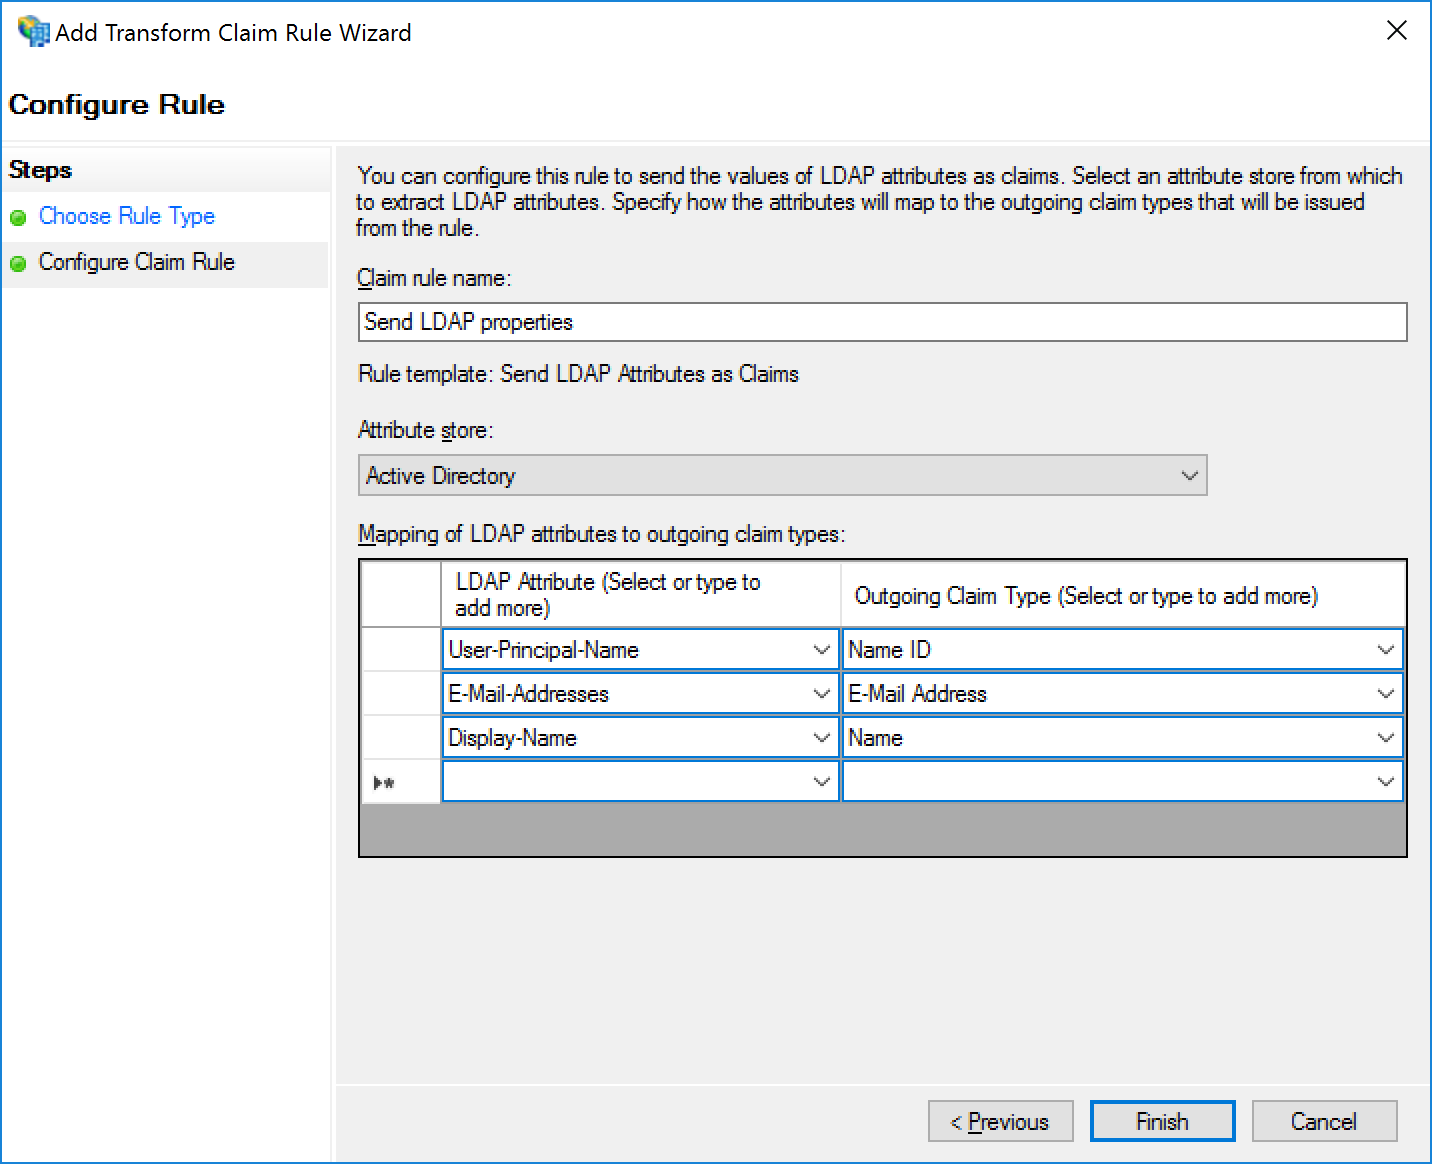
In the Edit Claim Rules dialog box on your ADFS server, we will configure the claims to be sent to MyGet:
- On the Issuance Transform Rules tab, click Add Rule.
- Select Send LDAP Attributes as Claims as the template to use and click Next.
- Enter a Claim rule name, for example
Send LDAP properties. - As the Attribute store, select Active Directory.
In the Mapping of LDAP attributes to outgoing claim types, enter the following claims mappings:
- LDAP Attribute:
User-Principal-Name; Outgoing Claim Type:Name ID - LDAP Attribute:
E-Mail-Addresses; Outgoing Claim Type:E-Mail Address - LDAP Attribute:
Display-Name; Outgoing Claim Type:Name
- LDAP Attribute:
- Click Finish to store these rules.
Back in the MyGet Add authentication module dialog:
- Enter the WS-Federation metadata URL, for example
https://acmecorpadfs.acmecorp.local/FederationMetadata/2007-06/FederationMetadata.xml - Click Add to save the configuration.
FAQ
Do users require a MyGet username/password?
Authentication modules will still force users to create a MyGet username/password. Even when an authentication module is configured, users will still have to create credentials on MyGet!
Here's the reason: not every package management client supports external authentication modules. Currently, only NuGet supports external authentication modules via our credential provider. For other package managers, a simple username/password (or access token) will be required.
When disabling/removing a user account externally, will that also disable that user account's access to MyGet?
No, not directly. Authentication modules operate in a federated mode. MyGet never sees external credentials, and MyGet can never access the external user store. This means we can never know a user left the company and was removed from Active Directory. Even with authentication modules, you as a MyGet Enterprise administrator will have to ensure users are removed from MyGet.
MyGet credentials, including username and access tokens, remain on MyGet and therefore are not disabled when disabling the user account in the external authentication provider.
I have configured an authentication module, but am always redirected back to the login page
The most common reason for this to happen is because user self-registration is disabled in your MyGet Enterprise account.
When self-registration is disabled, first-time logins via an authentication module will fail - as they are essentially a registration.
If you want to keep self-registration disabled, users will have to login once with MyGet credentials, adn then link their identity via their profile page (top-right menu, View Profile, then Identities, Add one now). After doing that, login via an authentication module will work.
We recommend informing your new users about this workflow, so they can make use of the authentication module at hand.
Do you recommend editing or removing authentication modules?
When an authentication module is added and more than one user is registered using it, we recommend never editing or removing the authentication module. Doing so may break user association and cause confusion with users of your MyGet Enterprise account.
Our recommendation is to configure them once, and never update them without good reason.
Read our contribution guidance or edit this page's source on GitHub.