MyGet npm support
After signing up for a MyGet account and creating a feed that serves as an npm registry, you can work with node modules (packages) using the npm command line and package.json.
Your npm registry URL
The full URL to your npm feed on MyGet can be found on the feed details page.
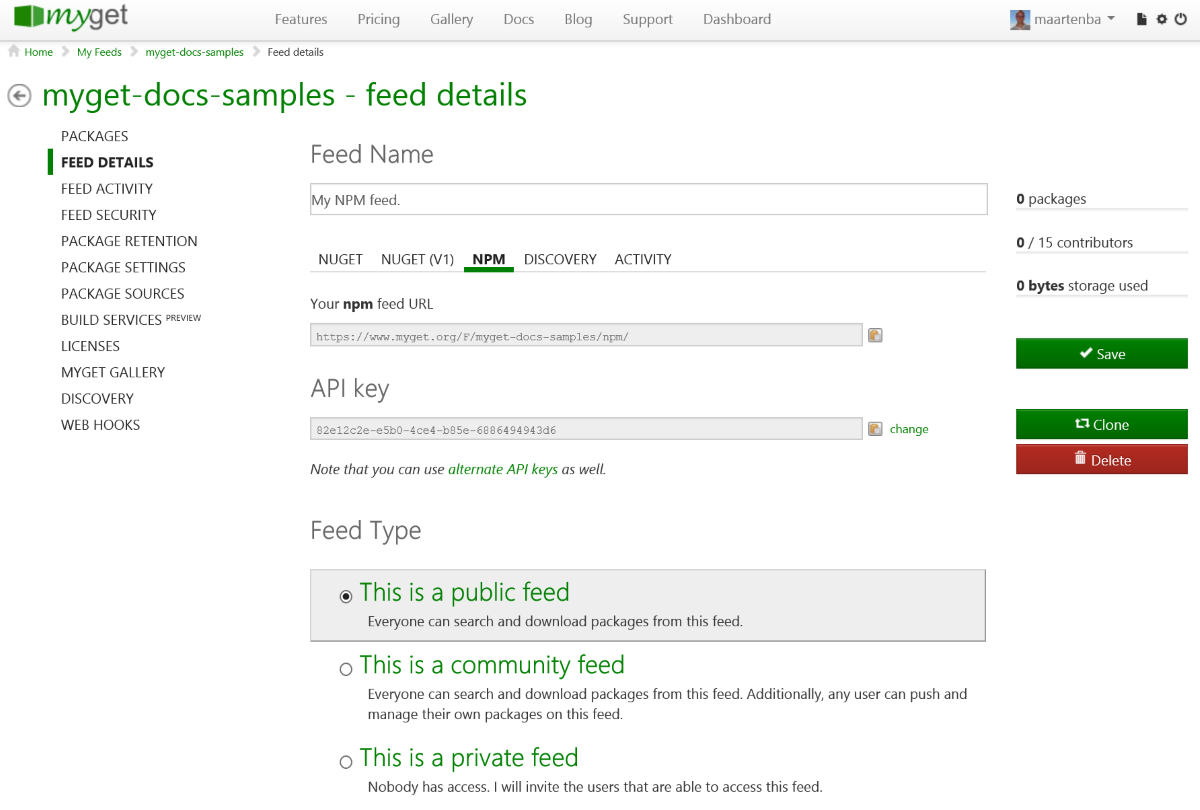
This URL can be used with any npm-compatible client. Note that a pre-authenticated URL is also available for private npm feeds.
Your MyGet npm feed can be used by providing the --registry switch on every npm command, or by running the following command to set the MyGet registry feed as the default:
npm config set registry https://www.myget.org/F/your-feed-name/npm/
Using multiple npm registries
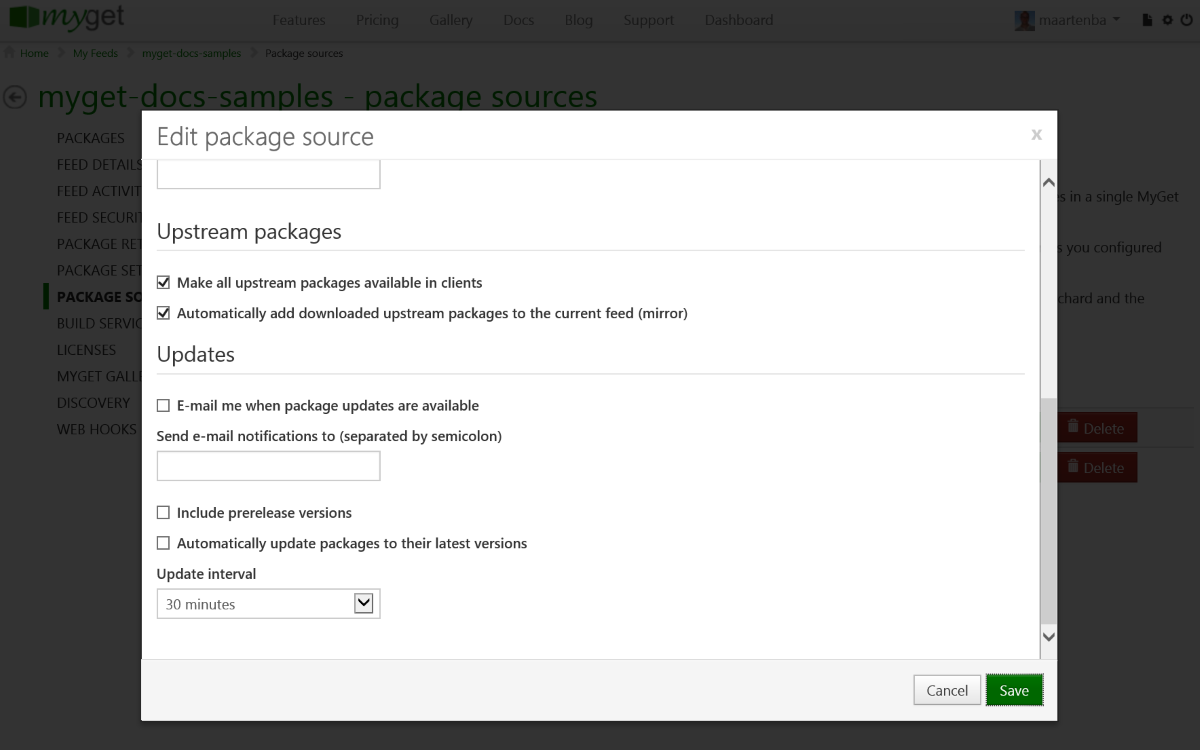
By default, your MyGet npm feed will only contain packages you have explicitly added, either using the web UI or the npm client. To have the public npm registry blended into your own, go to the Upstream Sources tab, edit the Npmjs.org upstream source and enable the Make all upstream packages available in clients option and the the Automatically add downloaded upstream packages to the current feed (mirror) option.
Note that using these settings it's also possible to blend more than one npm registry into one. You can also push npm packages to other npm registries using MyGet
We recommend running the following commands to have full support for the proxied npm registry:
npm config set strict-ssl true
npm config set ca ""
Note: Another approach to mixing repositories is to make use of scoped packages.
Uploading npm packages
If you want to publish a node module to a registry, you usually run the npm pack command. This is not different with MyGet: npm pack will package your node module into a .tgz file.
Authenticating interactively
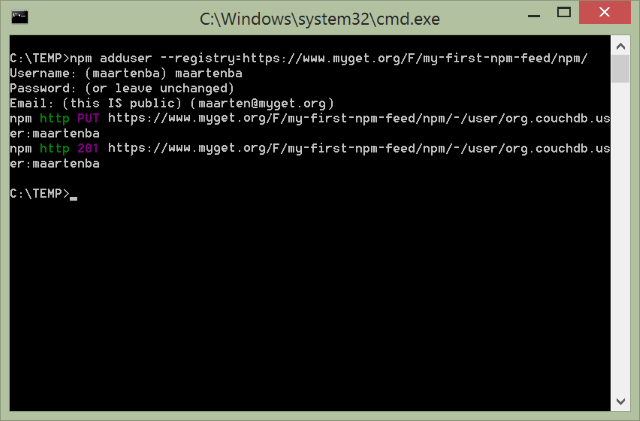
To publish the package to MyGet, you can run the adduser (or login) command once:
npm adduser --registry=https://www.myget.org/F/your-feed-name/npm/
Provide your MyGet username and password to make sure authentication is set up.
Note: If you have any special characters in your username or password, such as an @ or a space, make sure to use the URL encoded value (e.g. %40 for @, %23 for #, %2F for / and so on).
When this is done, any package can be published to the MyGet npm feed using the publish command:
npm publish --registry=https://www.myget.org/F/your-feed-name/npm/
Authenticating using an API key
Put the following lines in the .npmrc file:
registry=https://www.myget.org/F/your-feed-name/npm/
always-auth=true
//www.myget.org/F/your-feed-name/npm/:_authToken=your-api-key
The following command will then publish to your MyGet feed:
npm publish
Important! As per the npm publish docs, MyGet will add the latest tag to the published package, unless a different tag is specified using the --tag switch. In our UI, we will show the latest version by semantic version, whereas the npm client will make use of the tags to check for latest version.
Working with private npm registry feeds
If a MyGet npm feed is marked as private, it will always require authentication. To setup authentication, run the following commands:
npm adduser --registry=https://www.myget.org/F/your-feed-name/npm/
npm config set always-auth true
Provide your MyGet username and password to make sure authentication is setup.
Note: If you have any special characters in your username or password, such as an @ or a space, make sure to use the URL encoded value (e.g. %40 for @, %23 for #, %2F for / and so on).
Tip: Use the npmrc module to make switching between different .npmrc files easier.
Referencing npm packages in package.json
The npm command line client does not suport mixing multiple registries. Make sure to enable upstream source proxy if you want to blend your own feed and the public npm registry.
If you would like to use the default public registry yet still want to reference packages in your own npm feed, you can do so by using the tarball URL in your package.json file, for example:
{
  "name": "awesomeapplication",
  "version": "1.0.0",
  "dependencies": {
    "awesomepackage": "https://www.myget.org/F/your-feed-name/npm/awesomepackage/-/1.0.0.tgz"
  }
}
Running npm install will make sure any dependency is downloaded from the default npm registry, except for those where a full URL is given.
Note: If you are using a private npm feed, it is recommended to make use of a pre-authenticated URL to make sure no HTTP error 401 or 403 are returned during package download.
Working with scoped packages
The MyGet npm registry feed supports working with scoped packages. Scoped packages are "scoped" to a specific registry. E.g. all packages scoped @acmecorp may be retrieved from a MyGet npm registry feed, while other scopes and non-scoped packages flow in from the default npm registry.
Creating a scoped package
A scoped package can be created by setting the name property in package.json file correctly, for example:
{
  "name": "@acmecorp/awesomeapplication",
  "version": "1.0.0"
}
Dependencies can be scoped as well:
{
  "name": "@acmecorp/awesomeapplication",
  "version": "1.0.0",
  "dependencies": {
    "@acmecorp/awesomepackage": "1.0.0"
  }
}
More information on scoped packages is available from the npm docs.
Publishing a scoped package
Scopes can be associated with a specific registry. This allows for seamless mixing of packages from various npm registries.
Let's associate the scope @acmecorp with the https://www.myget.org/F/your-feed-name/npm/ npm registry feed. We can do this manually, by adding the following to our .npmrc file:
@acmecorp:registry=https://www.myget.org/F/your-feed-name/npm/
//www.myget.org/F/your-feed-name/npm/:_password="base64encodedpassword"
//www.myget.org/F/your-feed-name/npm/:username=someuser
//www.myget.org/F/your-feed-name/npm/:email=someuser@example.com
//www.myget.org/F/your-feed-name/npm/:always-auth=true
It's probably easier to generate these entries from the command line by running:
npm config set @acmecorp:registry=https://www.myget.org/F/your-feed-name/npm/
npm login --registry https://www.myget.org/F/your-feed-name/npm/ --scope=@acmecorp
npm config set always-auth true --registry https://www.myget.org/F/your-feed-name/npm/
From now on, we can publish and consume any package that has the @acmecorp scope. Npm will automatically direct requests to the correct registry.
Note: packages.json must not contain a publishConfig property. If it does, make sure it points to the correct registry or remove the entry. The npm client will always push to the registry specified in this property, no matter which registry is specified on the command line.
Working with multiple (scoped) registries
The npm client only supports working with one "main" registry. This can be circumvented by aggregating multiple registries into a MyGet registry feed using upstream sources. However, sometimes it's enough to work with one "main" registry and just fan out to other registries for specific scopes.
Since scopes can be associated with a specific registry, we can seamlessly mix scoped packages from various npm registries. For example, we could register the @acmecorp scope to go to our own MyGet registry feed, @some-vendor to hit the npm registry supplied by a vendor, and use Npmjs.org as the "main" registry.
Our .npmrc file would look like the following:
@acmecorp:registry=https://www.myget.org/F/your-feed-name/npm/
//www.myget.org/F/your-feed-name/npm/:_authToken=<myget-access-token>
//www.myget.org/F/your-feed-name/npm/:always-auth=true

@some-vendor:registry=https://npm.example.com/
//npm.example.com/:_password="base64encodedpassword"
//npm.example.com/:username=someuser
//npm.example.com/:email=someuser@example.com
//npm.example.com/:always-auth=true
This setup will:
- Use Npmjs.org as the "main" registry, since we did not set the
registryoption. - Use
https://www.myget.org/F/your-feed-name/npm/for the@acmecorpscope. - Use
https://npm.example.com/for the@some-vendorscope.
Fixing "403 Forbidden" while running npm login
A common cause are special characters in your username or password. For special characters such as an @ or a space, make sure to use the URL encoded value (e.g. %40 for @, %23 for #, %2F for / and so on).
Fixing "401 Unauthorized" after running npm login
When working with private npm registries, it is required to run npm login to store authentication details into a .npmrc file in your user profile folder. Some npm versions miss writing one specific setting, resulting in 401 Unauthorized when working with MyGet npm registries.
To resolve this, edit the .npmrc file and make sure the //www.myget.org/F/your-feed-name/:always-auth= setting is set to true. Here's an example:
registry=https://www.myget.org/F/your-feed-name/npm/
//www.myget.org/F/your-feed-name/npm/:_password="xxxxxx"
//www.myget.org/F/your-feed-name/npm/:username=your-username
//www.myget.org/F/your-feed-name/npm/:email=you@example.com
//www.myget.org/F/your-feed-name/npm/:always-auth=true
Note: Depending on the npm version being used, a trailing slash (/) may or may not be needed for the URL's in .npmrc. When authentication fails, make sure to try both the URL with and without the trailing slash.
Fixing "Error: CERT_UNTRUSTED"
When installing packages from your MyGet npm registry, you may see an error:
npm ERR! Error: CERT_UNTRUSTED
To work around this issue, run:
npm config set ca ""
Additionally, you may want to run the SSL checker and verify your computer has all required certification authorities installed.
Company proxy server
When using a company proxy server, make sure to configure it correctly. Justin James has a great guide to npm, bower, git and bash proxy configurations available.
Read our contribution guidance or edit this page's source on GitHub.